evoVIU Dokumentation
-
Einleitung
-
Allgemeines & Sicherheit
-
Hardware
-
Software
-
- Articles coming soon
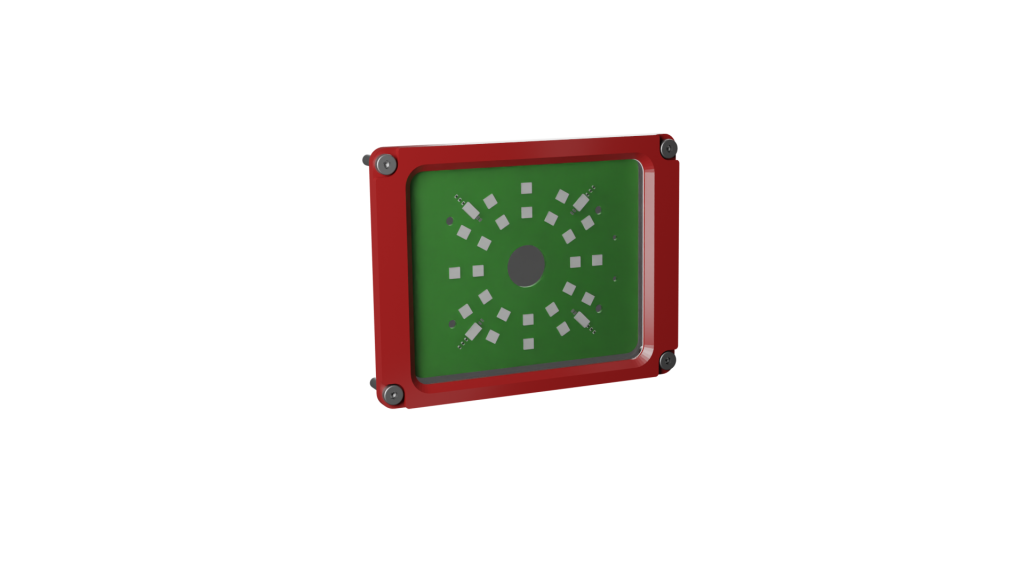
In diesem Kapitel lesen Sie alles über das Lichtmodul Loxi1-X.
1. Übersicht
Das Loxi1-X Lichtmodul gehört zur Klasse der direkten, internen Beleuchtung.
Der Aufbau des Lichtmoduls besteht aus acht Segmenten mit je drei Leuchtdioden. Insgesamt verfügt das Lichtmodul somit über 24 LEDs, die über die Farbkodierung mit unterschiedlichen Wellenlängen ausgestattet werden können. Vor allem organische Oberflächen lassen sich mit dem Loxi1-X Modul am besten ablichten.
//Abstandsmessung
Neben den LEDs hat das Loxi1-X-Modul 4 TOF-Sensoren mit einer Range von 0 – 65535 und kann damit präzise den Abstand von bis zu 1m entfernten Zielobjekten messen.
Die Implementierung folgt in späteren Softwareversionen.
2. Hauptmerkmale
- Direktes Lichtmodul
- Individuelle Einstellung für jede einzelne LED
- Bis zu 8 Helligkeits-Level für jede einzelne LED
- Abstandssensor für Abstandsmessung bis 1m
3. Anwendungsbereiche
- Organische Oberflächen
- Barcodes
- Labels
- Sichtfeldbereiche
4. Farbcodierung
- -R | Red (612 – 630nm)
- -G | True Green (513 – 545nm)
- -B | Blue (450 – 480nm)
- -A | Amber (609-624nm)
- -W| White (4000K)
5. Austausch
- Fahren Sie das System über die Weboberfläche herunter.
- Schalten Sie die Spannungsversorgung der evoVIU ab.
- Öffnen Sie die vier Schrauben der Gehäusefront der evoVIU.
- Öffnen Sie die vier Schrauben des Loxi1-X Lichtmoduls.
- Nehmen Sie die Platine ab und legen Sie die Austauschplatine in die Kamera.
- Schrauben Sie zunächst die beiden Schrauben auf der Front-Docker-Seite an und stellen Sie davor sicher, dass das Modul gerade auf der Haltefläche und den Kontakten liegt.
- Schrauben Sie nun die beiden verbleibenden Schrauben des Moduls fest.
- Schrauben Sie die Frontseite wieder auf die Kamera.
- Schalten Sie die Spannungsversorgung der Kamera an.
- Wenn innerhalb der nächsten 30 Sekunden die LEDs blinken, können Sie das neue Modul nutzen.
6. Variantennummer
XXXXX-XXX-L1-R | L1-R: Red / L1-G: Green / L1-B: Blue / L1-A: Amber / L1-W: White
