evoVIU Dokumentation
-
Einleitung
-
Allgemeines & Sicherheit
-
Hardware
-
Software
-
- Articles coming soon
Die Custom Routines sind ein Relikt aus früheren Versionen der Kamera. Mittlerweile werden sie beinahe vollständig durch die Workflows abgelöst. Da sie jedoch immer noch zum Teil in Benutzung sind, bleibt die Anleitung hier erhalten. Seid euch aber bitte bewusst, dass manche Komponenten mittlerweile anders aussehen oder auch eine andere Bezeichnung haben.
Ziel der OCR Custom Routine ist, Codes, Labels oder andere Zeichen auslesen zu können. In diesem Kapitel erfahren Sie alles, was Sie wissen müssen, um diese Custom Routine durchzuführen.
1. Überblick
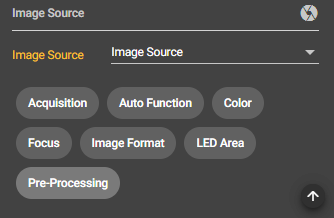
Sobald Sie in der Image Source ein Bild aufgenommen haben, können Sie dieses in der Custom Routine Configuration Bar unter Image Source auswählen. Ohne diese Auswahl kann die Routine nicht gestartet werden.
Mit Klick auf den Play Button in der Control Bar wird der Stream gestartet. Je nachdem, welchen Aufnahme-Modus Sie eingestellt haben, erscheint Ihr Bild als Stream.

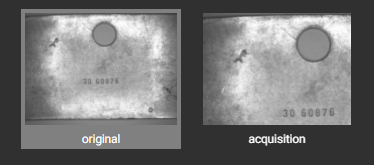
2. Acquisition
Wechseln Sie vom Original-Bild zum Acquisition-Bild, damit Sie Ihre Einstellungen direkt sehen können.
Camera Orientation
Mit dieser Einstellung können Sie das Bild drehen. Steht Ihr Code beispielsweise auf dem Kopf, können Sie die camera orientation auf 180 Stellen.
Acquisition Strategy
Hier können Sie zwischen Single Image und Image Fusion wählen.
- Bei Single Image wird exakt ein Bild aufgenommen.
- Bei der Image Fusion nutzt man das externe Licht. Nacheinander wird das Bauteil von jeder der vier Seiten belichtet und aufgenommen. Sobald alle vier Bilder gemacht wurden, werden diese zu einem verschmolzen. So können Ziffern aufgrund der Schattierungen besser erkannt werden.
2. Process
Unter Process stellen Sie die Bildverarbeitungsparameter ein, die Sie benötigen, um Ziffern oder Zeichen auszulesen.
Process Settings
Training Set
Laden Sie hier Ihr Trainingsset hoch. Das Trainingsset beinhaltet nur Ziffern und das Rohbild soll so verarbeitet werden, dass man nur Ziffern erkennen kann.
Use Special Digit Differentiation
Wenn Sie dieses Feature aktivieren, wird bei Zahlen und Buchstaben, die häufig aufgrund ihrer ähnlichen Struktur mit anderen Zahlen oder Buchstaben verwechselt werden – beispielsweise die 8 und die 0 – im Nachgang erneut überprüft, um welche der beiden Zahlen es sich schlussendlich handelt.
Closing Kernel
Hier können Sie einen Wert zwischen 1 und 15 wählen. Je größer Sie diesen Wert wählen, desto eher werden die Lücken zwischen den Buchstaben geschlossen. So werden kleine Löcher in Objekten geschlossen, indem sie miteinander verbunden werden.
Largest Noise Area
Hier können Sie einen Wert zwischen 0 und 10000 wählen. Mit diesem Wert legen Sie die Größe der Störung fest. Es handelt sich dabei um die Anzahl der Pixel in der Fläche. Sie können damit einstellen, wie stark das Bild rauschen darf.
Correction Term
Mit diesem Parameter nehmen Sie Anpassungen des Schwellwerts vor. Der identifizierte Mittelwert wird um Ihren hier eingestellten Wert verändert.
Window Size
Hier stellen Sie die Größe der Fläche ein, in welcher ein lokaler Threshold bestimmt wird. Je größer der Wert desto größer die Fläche, in der der Mittelwert für den Schwellwert berechnet wird.
Smoothing Kernel Size
Hier stellen Sie ein, mit welcher Flächengröße geglättet werden sollen.
Use AI
Aktivieren Sie den Button, wenn das Set mit Hilfe von künstlicher Intelligenz lernen soll.
Largest Noise Region
Width
Der von Ihnen gewählte Wert bestimmt die maximale Breite der Region, in der sich die Noise Area ausdehnen darf.
Height
Der von Ihnen gewählte Wert bestimmt die maximale Höhe der Region, in der sich die Noise Area ausdehnen darf.
Code Infos
Width Range Max
Der eingestellte Wert bestimmt die maximale Breite, die der auszulesende Buchstabe oder die Ziffer haben kann.
Width Range Min
Der eingestellte Wert bestimmt die minimale Breite, die der auszulesende Buchstabe oder die Ziffer haben kann.
Height Range Max
Der eingestellte Wert bestimmt die maximale Höhe, die der auszulesende Buchstabe oder die Ziffer haben kann.
Height Range Min
Der eingestellte Wert bestimmt die minimale Höhe, die der auszulesende Buchstabe oder die Ziffer haben kann.
Number of Characters
Mit diesem Wert können Sie angeben, wie viele Buchstaben/Zeichen erkannt werden sollen beziehungsweise wie viele Buchstaben der Code hat.
Intensity Level
Hier können Sie zwischen dunkel und hell wählen. Sie können entscheiden, ob Sie den Code/die Zeichen hell und den Hintergrund dunkel oder den Code dunkel und den Hintergrund hell haben möchten.
3. FTP Settings
Wenn Sie Ihre Bilder auf dem FTP Server speichern möchten, müssen Sie hier unter den FTP Settings Ihre Angaben machen.
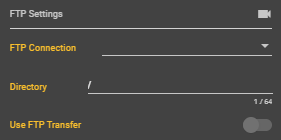
FTP Connection
Wählen Sie unter diesem Punkt Ihre erstellte FTP Connection aus. Diese können Sie unter dem Punkt Connections erstellen.
Directory
Geben Sie den Pfad Ihres Ablageortes ein, an dem Sie Ihre Bilder speichern möchten. So wird für den Vorgang ein neuer Ordner angelegt.
Use FTP Transfer
Hier können Sie auswählen, ob Sie den Transfer auf den FTP Server verwenden möchten oder nicht. Nur wenn der Button aktiviert ist, werden Bilder auf Ihrem Server gespeichert.
4. IQPress
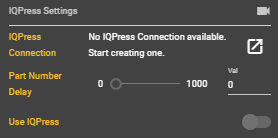
IQPress Connection
Unter diesem Punkt können Sie eine neue IQPress Connection erstellen. IQPress ist ein Datenbanksystem, dem Sie Daten zuteilen und entnehmen können.
Part Number Delay
Hier können Sie eine individuelle Verzögerung bis zum Aufruf eines Teiles in der Datenbank einstellen.
Use IQPress
Hier können Sie auswählen, ob Sie IQPress verwenden möchten oder nicht.
5. PLC
Unter dem Menüpunkt PLC können Sie eine PLC-Connection erstellen und somit eine Verbindung über eine Webschnittstelle aufrufen
PLC Connection
Hier können Sie entweder eine PLC-Connection auswählen oder eine neue erstellen. Wenn Sie auf das Symbol neben diesem Punkt klicken, öffnet sich ein Dialogfenster zum Erstellen einer neuen Connection.
Use PLC
Wählen Sie hier aus, ob Sie PLC nutzen möchten oder nicht.
Data Block
Geben Sie hier an, welchen Datenblock Sie wählen möchten.
Start Byte
Geben Sie hier an, welches Byte Ihr Start-Byte sein soll.
