In diesem Kapitel erfahren Sie, welche Einstellungen Sie für Ihre Smart Kamera tätigen können. Sie haben bereits beim ersten Start einige Einstellungen vorgenommen, welche Sie hier wieder ändern können.
1. Camera
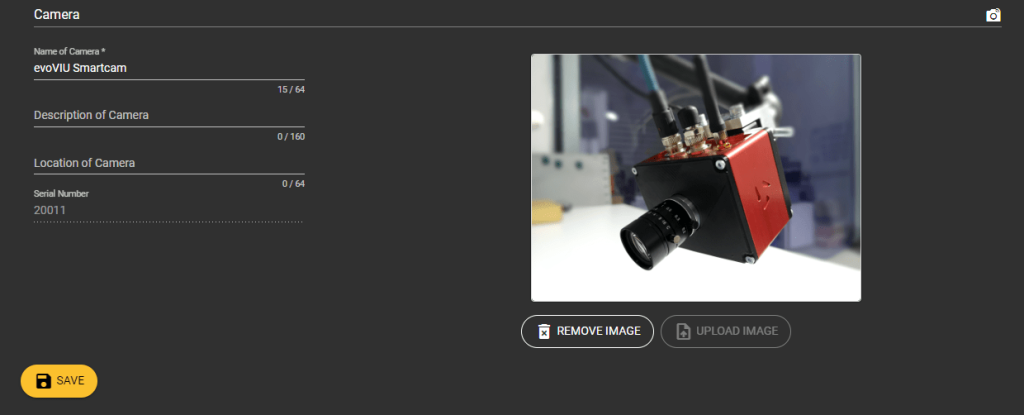
Name of Camera
Geben Sie hier Ihrer Kamera einen Namen oder ändern Sie diesen.
Description of Camera
Fügen Sie Ihrer Kamera eine Beschreibung hinzu und stellen Sie so sicher, dass Sie wissen um welche Kamera es sich genau handelt.
Location of Camera
Geben Sie an, wo genau sich Ihre Kamera befindet.
Rechts können Sie ein Foto Ihrer Kamera oder des Betrachtungsobjektes hochladen. Falls Sie mehrere Kameras besitzen, können Sie so genau sehen, um welche es sich handelt. Ebenfalls haben Sie die Möglichkeit über die API diese Informationen jederzeit abzurufen.
2. Customization
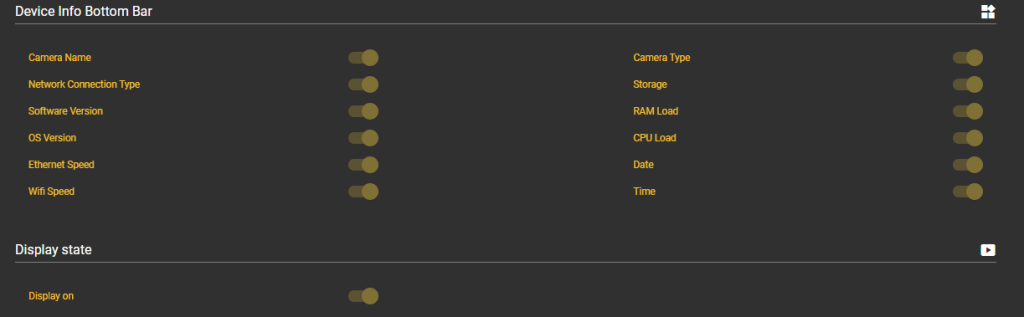
Unter diesem Punkt können Sie einstellen, welche Informationen Sie gerne in der Bottom Bar sehen würden. Wählen Sie diese einfach an.
Camera Name
Den von Ihnen gewählten Namen
Network Connection Type
Ihren Netzwerkverbindungstyp, der primär genutzt wird.
Software Version
Softwareversion Ihrer Smart Kamera
OS Version
Version Ihres Betriebssystem
Ethernet Speed
Geschwindigkeit Ihrer Ethernet Verbindung in Mb/s
Wifi Speed
Geschwindigkeit Ihrer Wlan-Verbindung
Camery Type
Ihr Kamea-Typ
Storage
Speicherauslastung Ihrer Kamera
RAM Load
RAM-Auslastung
CPU Load
CPU-Auslastung
Date
Aktuelles Datum
Time
Aktuelle Uhrzeit
Display on
Hier können Sie das Display Ihrer Kamera aus- oder anschalten.
Bridging/ Isolation
Hier können Sie Ethernet oder WiFi Bridging anschalten und so mehrere Netzwerke zusammenfügen oder das Bridging ausschalten.
Start Options
Hier können Sie auswählen, ob Sie beim Öffnen der Webanwendung den Home Screen oder direkt das Dashboard sehen möchten.
3. Date and Time
Unter diesem Einstellungspunkt können Sie die richtige Uhrzeit und das richtige Datum überprüfen und einstellen.
HinweisBis RC3 ist noch keine Realtime-Clock in der Kamera verbaut. Bei einem Neustart kann es daher sein, dass die beim Herunterfahren zuletzt gespeicherte Zeit wieder dargestellt wird. Nutzen Sie einen NTP-Server, damit sich auch beim Neustart die Uhrzeit mit der Anlage synchronisiert.
NTP server address:
Im Eingabefeld sind folgende Angaben möglich:
IP-Adresse: Eingabe der IP-Adresse im IPv4-Format: Beispiel: 192.168.9.1
Domain: Eingabe der NTP-Domain: Beipiel: time1.google.com
HinweisDurch die Eingabe der IP-Adresse Ihres NTP-Servers synchronisiert sich die Kamera automatisch mit der aktuellen Uhrzeit des Servers bzw. der Anlage.
Hinweis: Neustart nach Einstellung des NTP-ServersEs ist zu empfehlen, nach dem Einstellen des NTP-Servers die Kamera neuzustarten. Dabei wird sichergestellt, dass sich alle Teile der Kamera mit der neuen Uhrzeit synchronisieren. Gehen Sie dazu einfach auf "System > Restart" und laden Sie nach ca. 1 Minute den Browser neu.
Hinweis: Primary RoutingVergewissern Sie sich, dass Ihre NTP-Server Adresse (Domain / IP-Adresse) am priorisierten Routing-Port verfügbar ist. Beispiel: NTP-Server ist über eine Domain (DNS-Adresse) am Ethernet-Port verfügbar, so muss diese als priorisierte Routing-Adresse ausgewählt werden. Gehen Sie dazu einfach auf "Ethernet > Use as primary routing". Der Vorgang kann 30 Sekunden dauern.
4. Ethernet
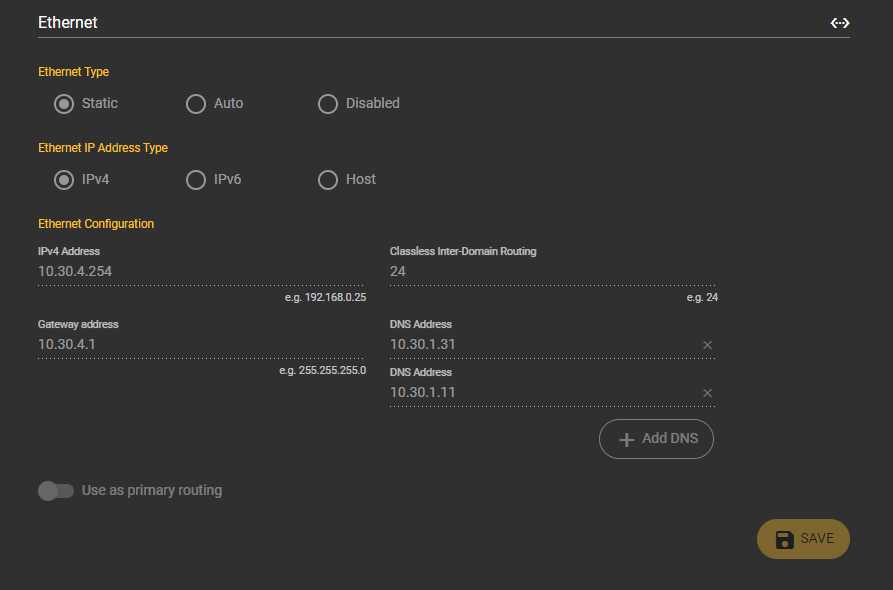
Unter diesem Einstellungspunkt können Sie Ihr Ethernet-Netzwerkeinstellung anpassen.
Ethernet Type
Wählen Sie Static oder DHCP als Kommunikations-Typ.
Mit Static haben Sie die Möglichkeit selbst die IP-Adressen für das Zielnetzwerk anzugeben. Ebenso haben Sie neben Subnetz und Gateway die Möglichkeit mehrere verschiedene DNS-Server-Adressen anzugeben.
Mit Auto (DHCP) wird der Kamera über das Netzwerk eine IP-Adresse zugeteilt.
ACHTUNGBitte sprechen Sie mit Ihrer IT-Abteilung welche der beiden Optionen für Sie sinnvoll ist. In der Regel wird DCHP über eine Zuweisung mit Ihrer MAC-Adresse verwendet. Die IT gibt Ihnen nach der Freigabe sogleich die IP-Adresse mit, sodass Sie diese nicht suchen müssen. Es ist zu empfehlen diese Einstellungen über den Accesspoint zu machen, da eine Fehlkonfiguration Ihnen die Möglichkeit gibt weiter die Einstellung auf der Weboberfläche zu tätigen. Des Weiteren sehen Sie rechts in der Übersicht die aktuelle Konfiguration der Kamera.
Ethernet IP Address Type
Wählen Sie IPv4, IPv6 oder Host als Ethernet IP Adresstyp.
Ethernet Configuration
Unter diesem Punkt können Sie Ihre IPv4-, IPv6- oder Host-Adresse, das Classless inter-domain routing, die Gateway Adresse und die DNS-server Adresse angeben.
Use as primary routing
Mit Aktivierung dieses Punktes (gelb) geben Sie dem Ethernet-Port die Freigabe zur primären Nutzung des Netzwerk-Ports. In diesen Falle werden die DNS-Sever des Ethernet-Ports beispielsweise bei der Kommunikation mit Domains verwendet. Wird der Punkt unter Ethernet aktiviert, so wird er automatisch unter WiFi deaktiviert.
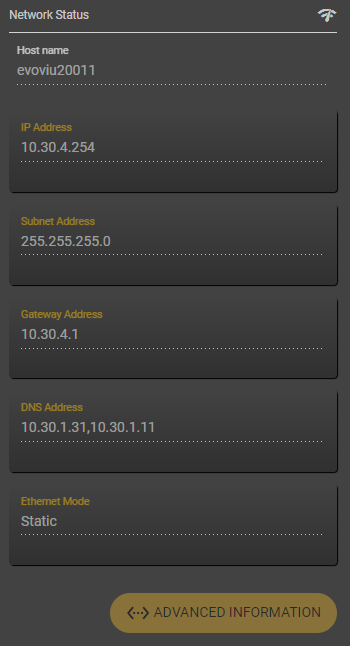
Auf der rechten Seite im Network-Status finden Sie den Hostnamen, den Sie bei der Nutzung des Ethernets oder des Wifis anpassen können. Geben Sie den Namen an, mit welchen Sie die Kamera im Netzwerk sichtbar machen wollen. Nach Eingabe wird der Name automatisch übernommen, ein speichern ist nicht nötig. Beachten Sie bitte den Hinweis “Reload” um den neuen Namen im Browser sichtbar zu machen. Außerdem sind unter diesem Punkt alle anderen Daten aufgelistet.
Hinweis | NamensgebungEntsprechend der RFC1123 sind folgende Zeichen für den Hostname erlaubt. [a-z] oder [A-Z] oder [0-9] or [-]. Dabei darf das Minus nicht das erste Zeichen sein!
Hinweis | Reload VisionwebDer Hostname wird automatisch bei Eingabe übernommen. Bei Wechsel von einer Seite auf die nächste Seite wird derzeit im Anschluss der alte Hostname noch angezeigt. Durch Reload der Seite wird der aktualisierte Name dargestellt.
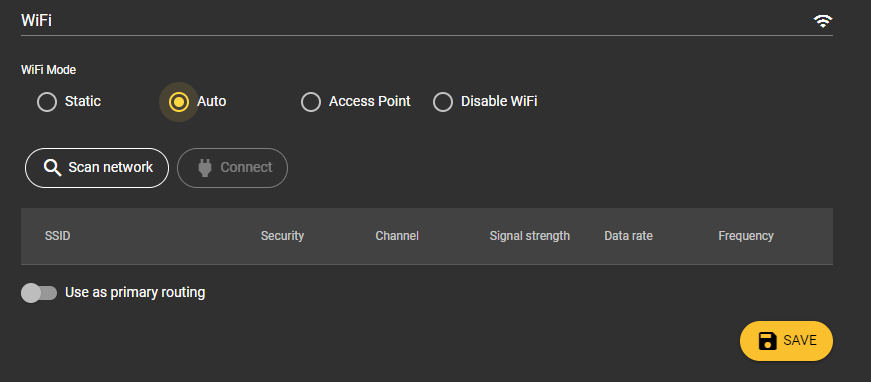
5. WiFi
Unter diesem Punkt können Sie Ihre WiFi-Netzwerkeinstellungen anpassen.
WiFi Mode
Entscheiden Sie sich für einen der Modi Static, Auto, Access Point oder deaktivieren Sie Ihr WiFi.
Static: Verbindung mit einen Netzwerk über die Eingabe der SSID und des Passwortes, sowie zur Anlage einer statischen IP-Adresse mit Gateway und Subnetmask.
Auto: Suchen Sie aus einer Liste von umgebenden Netzwerken die passende aus.
Accesspoint: Erstellen Sie ein eigenes Netzwerk der Kamera.
Disable WiFi: Deaktivieren Sie die WiFi-Schnittstelle
5.1 Static
WiFi IP address type
Wählen Sie IPv4, IPv6 oder Host als WiFi IP Adresstyp.
WiFi configuration
Unter diesem Punkt können Sie Ihre SSID, Ihr Passwort, Ihre IPv4-, IPv6- oder Host-Adresse, das Classless inter-domain routing, die Gateway Adresse und die DNS-Server Adresse(n) für Ihre WiFi Verbindung angeben.
Use as primary routing
Mit Aktivierung dieses Buttons (gelb) geben Sie dem WiFi-Port die Freigabe zur primären Nutzung des Netzwerk-Ports. In diesem Falle werden die DNS-Sever des WiFi-Ports beispielsweise bei der Kommunikation mit Domains verwendet. Wird der Punkt unter WiFi aktiviert, so wird er automatisch unter Ethernet deaktiviert.
5.2 Auto
Scan network
Durch klicken dieses Buttons wird das umliegende Netzwerk der Kamera gescannt. Danach erfolgt eine Auflistung aller verfügbaren Netzwerke.
SSID: Name des Netzwerks
Security: Typ der Verschlüsselung
Channel: Angabe des Kanales
Signal strength: Angabe der Signalstärke des Netzwerkes (0-100%)
Data rate: Datenrate über das verfügbare Netzwerk
Frequency: Frequenzband 2.4GHz / 5GHz
HinweisDer Scan des Netzwerkes kann bis zu 30 Sekunden dauern.
Connect
Wählen Sie im Anschluss ein Netzwerk aus und drücken Sie auf Connect. Geben Sie im Dialogfenster dazu das Netzwerkpasswort ein und klicken Sie auf Confirm.
Use as primary routing
Mit Aktivierung dieses Buttons (gelb) geben Sie dem WiFi-Port die Freigabe zur primären Nutzung des Netzwerk-Ports. In diesem Falle werden die DNS-Sever des WiFi-Ports beispielsweise bei der Kommunikation mit Domains verwendet. Wird der Punkt unter WiFi aktiviert, so wird er automatisch unter Ethernet deaktiviert.
5.3 Access Point
Durch das Aktivieren des Access Points haben Sie die Möglichkeit, die Kamera über Ihren PC oder Ihr Mobiltelefon zu steuern. Beachten Sie im Anschluss nur die Hinweise der First-Step-Anleitung.
5.4 Disable WiFi
Deaktivieren Sie die Schnittstelle und stellen Sie somit sicher, dass der Betrieb nur über Ethernet läuft.
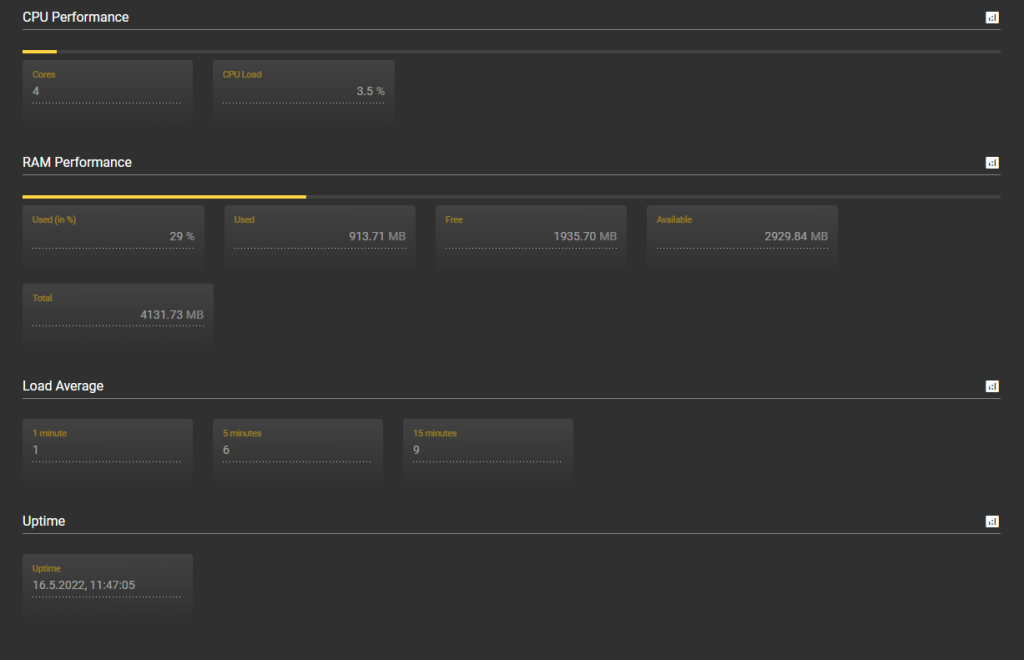
6. Performance
Unter dem Menüpunkt Performance werden die Performance Parameter Ihrer Kamera aufgelistet.
6.1 CPU Performance
Cores
Hier sehen Sie, aus wie vielen Prozessorkernen Ihre CPU besteht.
CPU Load
Hier sehen Sie zu wie viel Prozent die CPU ausgelastet ist.
6.2 RAM Performance
Used (in %)
Hier sehen Sie wie viel Prozent der RAM aktuell benutzt werden.
Used
Hier sehen Sie, wie viele MB des RAMs aktuell genutzt werden.
Free
Hier sehen Sie, wie viele MB des RAMs noch frei ist.
Availabe
Hier sehen Sie, wie viele MB des RAMs noch verfügbar ist.
Total
Hier sehen Sie, wie viele MB die RAM hat.
6.3 Load average
1 Minute
Hier sehen Sie, wie viele Prozesse in der letzten Minute am laufen waren.
5 Minutes
Hier sehen Sie, wie viele Prozesse in den letzten 5 Minuten am laufen waren.
15 Minutes
Hier sehen Sie, wie viele Prozesse in den letzten 15 Minuten am laufen waren.
6.4 Uptime
Uptime
Zeitpunkt des letzten Neustarts des Systems.
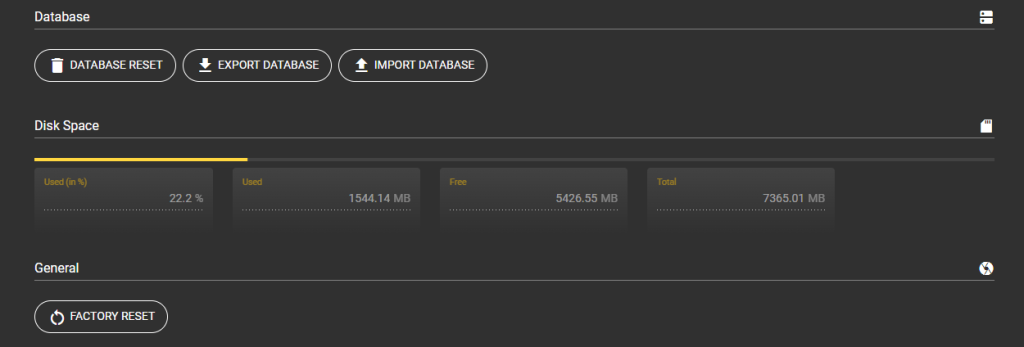
7. Storage
Unter dem Menüpunkt Storage finden Sie Angaben zu Ihrem Speicherplatz. Außerdem können Sie über die Buttons unten Ihre Datenbank und das System in die Werkseinstellung zurücksetzen.
Database Reset
Setzen Sie alle Einstellungen der Kamera zurück. Fehlkonfigurationen können Somit behoben werden
AchtungAlle gespeicherten Informatinen werden durch diesen Vorgang gelöscht!
Export Database
Exportieren Sie über diesen Button all Ihre Einstellungen. Dazu gehören alle Konfigurationen inklusive den eingestellten Parametern, gespeicherte Bilder und eingestellte Netzwerke.
Import Database
Importieren Sie über diesen Button eine Ihrer Datenbanken direkt auf die Kamera. Müssen Sie beispielsweise die Hardware wechseln oder erweitern, können Sie über diese Option einfach auf alle Ihre Einstellungen zurückgreifen. Dazu gehören alle Konfigurationen inklusive den eingestellten Parametern, gespeicherte Bilder und eingestellte Netzwerke.
Disk Space
Used (in %)
Hier sehen Sie wie viel Prozent des Speichers bereits genutzt werden.
Used
Hier sehen Sie wie viele MB des Speichers bereits genutzt werden.
Free
Hier sehen Sie, wie viele MB des Speichers noch frei sind.
Total
Hier sehen Sie, wie viel MB Ihr Speicher gesamt besitzt.
File System Storage
Max Storage Capacity
Stellen Sie hier ein, wie groß Ihr File Storage maximal sein darf. Den File Storage finden Sie unter Menüpunkt Files.
Used
Hier sehen Sie wie viele MB des Speichers bereits genutzt werden.
Factory Reset
Mit diesem Button setzen Sie Ihre Kamera auf die Werkseinstellung zurück.
AchtungAlle gespeicherten Informatinen werden durch diesen Vorgang gelöscht!
8. System
8.1 System Information
Unter diesem Punkt werden alle Eigenschaften Ihres Systems aufgelistet. Dazu gehören:
Kamera
Docker-Variante
Focus
Linse
verbautes Licht
Wireless Verbindung
Sensorcode
Display
All diese Informationen können auch als Bookmarks verwendet werden.
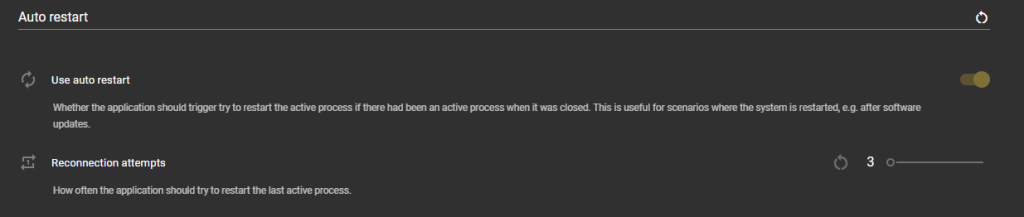
8.2 Auto Restart
Use Auto Restart
Wählen Sie diese Option, wenn die den Auto Restart aktivieren möchten. Ihr System wird dann – beispielsweise nach Software Updates – automatisch neu gestartet und stellt den letzten aktiven Prozess wieder her.
Reconnection Attempts
Stellen Sie hier ein, wie oft Ihre Kamera versuchen soll, bei einem Neustart den letzten aktiven Prozess wiederherzustellen.
8.3 System Actions
Power Off
Schalten Sie über diesen Button die Kamera aus.
Reboot
Rebooten Sie über diesen Button Ihre Kamera.
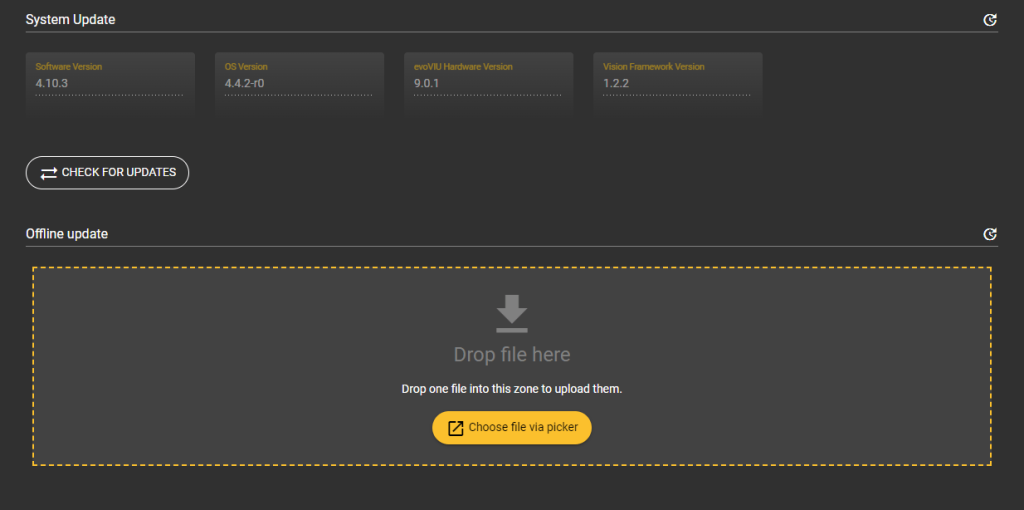
9. Update
Unter System Update sehen Sie Ihre Softwareversion, Ihre OS Version, Ihre evoVIU Hardware Version und Ihre Vision Framework Version. Außerdem können Sie unter diesem Punkt nach Updates suchen und diese ausführen oder Offline Updates durchführen.
Check for Updates
Über diesen Button können Sie online nach Updates suchen. Dafür muss die Kamera mit dem Internet verbunden sein. Nach Klick auf den Button erhalten Sie Rückmeldung, welche neue Software Version verfügbar ist. Außerdem erscheint der Start Update-Button. Klicken Sie diesen, um das Update durchzuführen. Während das Update durchgeführt wird, sehen Sie einen gelben Balken. Sobald dieser erlischt, ist der Prozess beendet. Warten Sie circa 30 Sekunden und laden Sie anschließend die Anwendung neu. Hierbei sollten Sie wieder einen Hinweis eines neuen SSL-Schlüssels erhalten.
Offline Update
Wenn Ihre Kamera nicht mit dem Internet verbunden ist, können Sie ein Offline-Software-Update durchführen. Dazu erhalten Sie eine Datei, die Sie per Drag and Drop in das vorgesehene Feld ziehen können. Anschließend erscheint ein Dialogfeld, in welches Sie einen Key eingeben müssen. Klicken Sie im Anschluss auf Confirm. Die Datei wird hochgeladen und das Update ausgeführt. Warten Sie circa 30 Sekunden und laden Sie die Kamera neu.