In this chapter you will learn which settings you can make for your smart camera. You have already made some settings at the first start, which you can change again here.
1. Camera
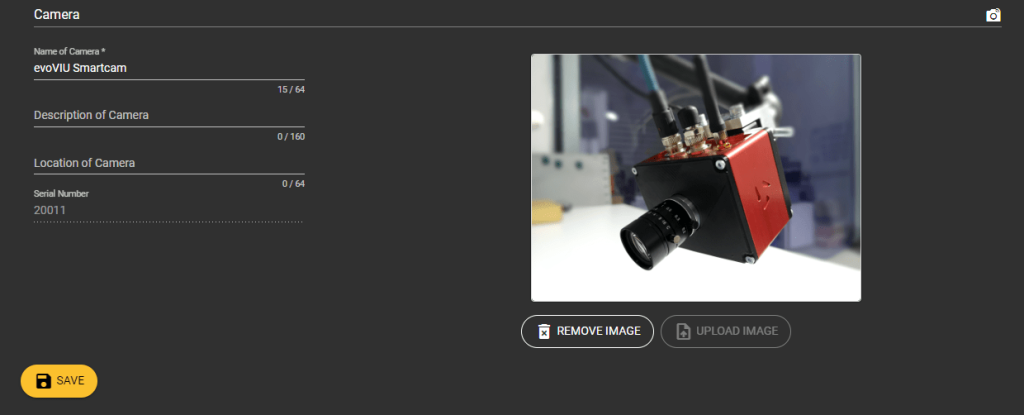
Name of Camera
Give your camera a name here or change it.
Description of Camera
Add a Description to your camera to make sure you know exactly what camera it is.
Location of camera
Specify where exactly your camera is located.
On the right, you can upload a photo of your camera or the viewing object. If you have more than one camera, you can see exactly which one it is. Likewise, you have the possibility to retrieve this information at any time via the API.
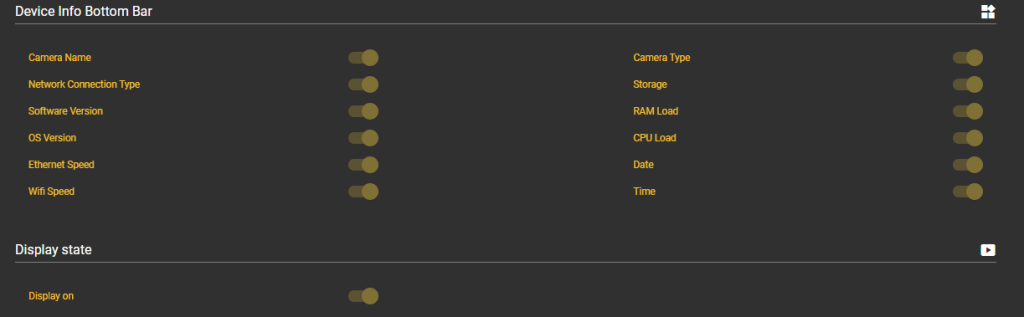
2. Customization
Under this item you can set what information you would like to see in the Bottom Bar. Simply select them.
Camera Name
The name you have chosen
Network Connection Type
Your network connection type that is primarily used.
Software version
Software version of your smart camera
OS version
Version of your operating system
Ethernet Speed
Speed of your Ethernet connection in Mb/s
Wifi Speed
Speed of your wifi connection
Camery type
Your camea type
Storage
Memory usage of your camera
RAM Load
RAM usage
CPU Load
CPU load
Date
Current date
Time
Current time
Display on
Here you can switch the display of your camera off or on.
Bridging/ Insulation
Here you can switch on Ethernet or WiFi bridging and thus combine several networks or switch off bridging.
Start Options
Here you can select whether you want to see the home screen or the dashboard directly when you open the web application.
3. date and time
Under this setting item, you can check and set the correct time and date.
Note
Until RC3 there is no realtime clock built into the camera. Therefore, when restarting, the time last saved during shutdown may be displayed again. Use an NTP server so that the time is synchronized with the system even at restart.
NTP server address:
The following entries are possible in the input field:
IP address: Enter the IP address in IPv4 format: Example: 192.168.9.1
Domain: Enter the NTP domain: Example: time1.google.com
Note
By entering the IP address of your NTP server, the camera automatically synchronizes with the current time of the server or system.
Note: Restart after setting the NTP server
It is recommended to restart the camera after setting the NTP server. This ensures that all parts of the camera synchronize with the new time. To do this, simply go to "System > Restart" and reload the browser after about 1 minute.
Note: Primary Routing
Make sure that your NTP server address (domain / IP address) is available on the prioritized routing port. Example: NTP server is available via a domain (DNS address) on the Ethernet port, so this must be selected as prioritized routing address. Just go to "Ethernet > Use as primary routing". The process can take 30 seconds.
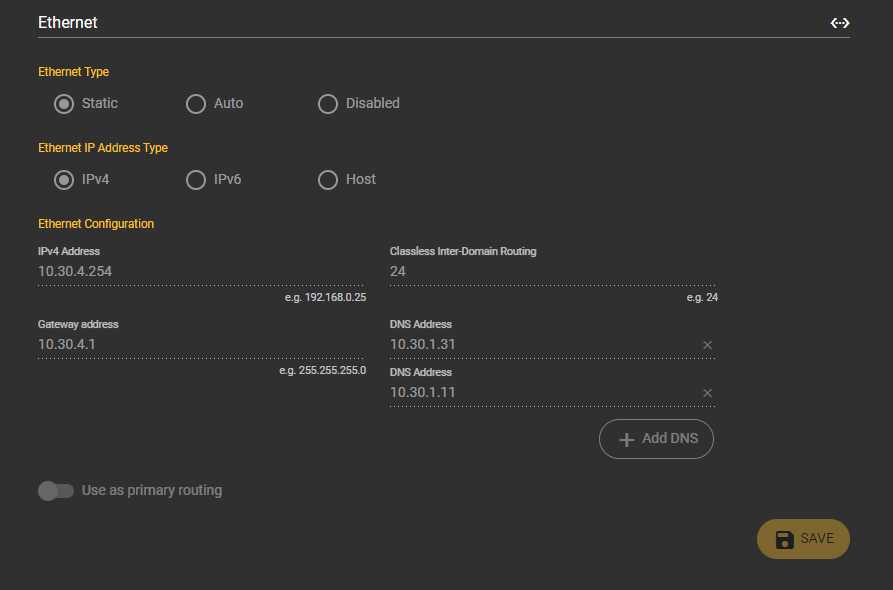
4. Ethernet
Under this setting item you can adjust your Ethernet network setting.
Ethernet Type
Select Static or DHCP as the communication type.
Static allows you to specify the IP addresses for the target network yourself. You also have the option of specifying several different DNS server addresses in addition to the subnet and gateway.
Auto (DHCP) assigns an IP address to the camera over the network.
ATTENTION
Please talk to your IT department which of the two options makes sense for you. Usually DCHP is used via an assignment with your MAC address. IT will immediately give you the IP address after approval, so you don't have to search for it. It is recommended to make these settings via the access point, as a misconfiguration will give you the option to continue making the settings on the web interface. Furthermore, you can see the current configuration of the camera in the overview on the right.
Ethernet IP Address Type
Select IPv4, IPv6 or Host as Ethernet IP address type.
Ethernet Configuration
Under this item you can specify your IPv4, IPv6 or host address, classless inter-domain routing, gateway address and DNS server address.
Use as primary routing
By activating this item (yellow) you give the Ethernet port the release for the primary use of the network port. In this case, the DNS servers of the Ethernet port are used, for example, when communicating with domains. If the item is activated under Ethernet, it is automatically deactivated under WiFi.
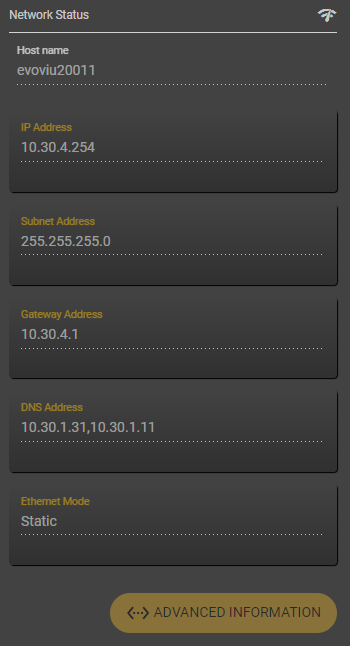
On the right side in the Network Status you can find the hostname, which you can customize when using Ethernet or Wifi. Enter the name with which you want to make the camera visible in the network. After entering the name is automatically taken over, a save is not necessary. Please note the hint “Reload” to make the new name visible in the browser. In addition, all other data are listed under this item.
Note | Naming
According to RFC1123, the following characters are allowed for the host name. [a-z] or [A-Z] or [0-9] or [-]. The minus must not be the first character!
Note | Reload Visionweb
The host name is automatically taken over when it is entered. When switching from one page to the next, the old host name is currently still displayed afterwards. Reload the page to display the updated name.
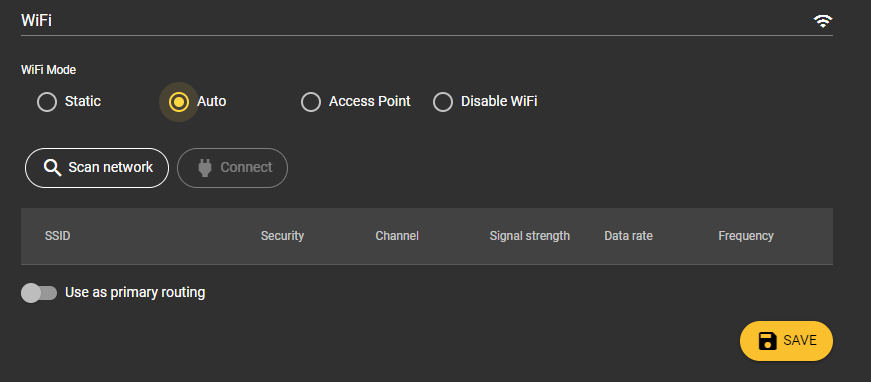
5. WiFi
Under this item you can adjust your WiFi network settings.
WiFi Mode
Choose one of the modes Static, Auto, Access Point or disable your WiFi.
Static: Connects to a network by entering the SSID and password, and creating a static IP address with gateway and subnet mask.
Auto: Select the appropriate network from a list of surrounding networks.
Access point: Create your own network for the camera.
Disable WiFi: Disable the WiFi interface
5.1 Static
WiFi IP address type
Select IPv4, IPv6 or Host as WiFi IP address type.
WiFi configuration
In this item, you can specify your SSID, password, IPv4, IPv6 or host address, Classless inter-domain routing, gateway address and DNS server address(es) for your WiFi connection.
Use as primary routing
By activating this button (yellow), you enable the WiFi port for primary use of the network port. In this case, the DNS severs of the WiFi port are used, for example, when communicating with domains. If the item is enabled under WiFi, it is automatically disabled under Ethernet.
5.2 Car
Scan network
Clicking this button will scan the surrounding network of the camera. This is followed by a listing of all available networks.
SSID: name of the network
Security: Type of encryption
Channel: Specification of the channel
Signal strength: Indication of the signal strength of the network (0-100%)
Data rate: Data rate over the available network
Frequency: Frequency band 2.4GHz / 5GHz
Note
The scan of the network can take up to 30 seconds.
Connect
Then select a network and press Connect. To do this, enter the network password in the dialog box and click Confirm.
Use as primary routing
By activating this button (yellow), you enable the WiFi port for primary use of the network port. In this case, the DNS severs of the WiFi port are used, for example, when communicating with domains. If the item is enabled under WiFi, it is automatically disabled under Ethernet.
5.3 Access Point
By activating the access point, you have the possibility to control the camera via your PC or cell phone. Afterwards, only follow the instructions in the First Step guide.
5.4 Disable WiFi
Disable the interface and thus ensure that operation is only via Ethernet.
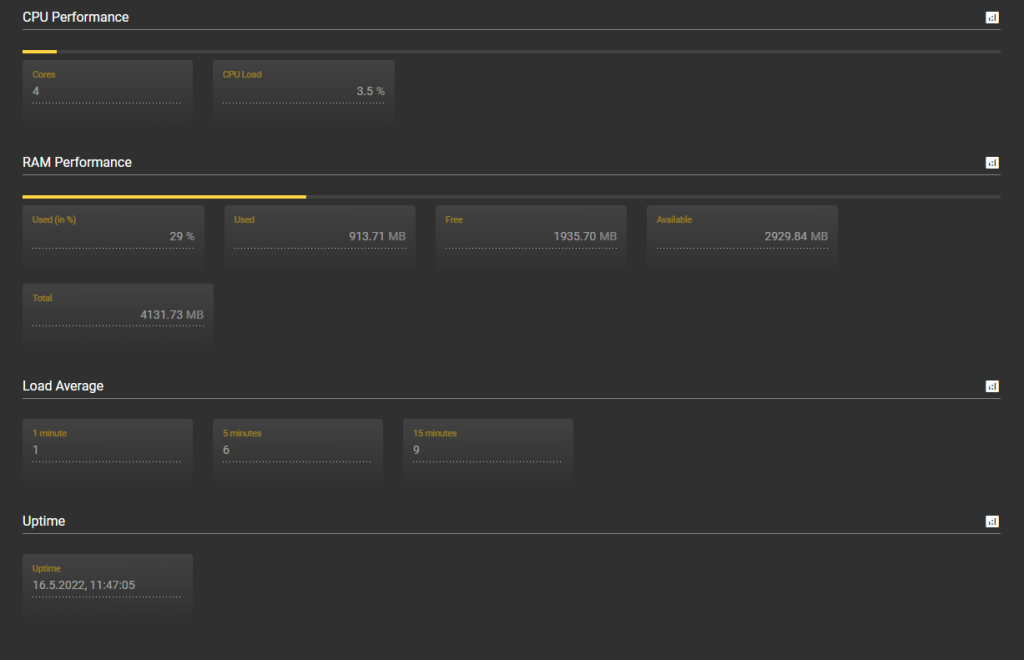
6. Performance
The Performance menu item lists the performance parameters of your camera.
6.1 CPU performance
Cores
Here you can see how many processor cores your CPU consists of.
CPU Load
Here you can see to what percentage the CPU is used.
6.2 RAM performance
Used (in %)
Here you can see what percentage of RAM is currently in use.
Used
Here you can see how many MB of RAM are currently in use.
Free
Here you can see how many MB of RAM is still free.
Availabe
Here you can see how many MB of RAM is still available.
Total
Here you can see how many MB the RAM has.
6.3 Load average
1 minute
Here you can see how many processes were running at the last minute.
5 Minutes
Here you can see how many processes were running in the last 5 minutes.
15 Minutes
Here you can see how many processes were running in the last 15 minutes.
6.4 Uptime
Uptime
Time of the last restart of the system.
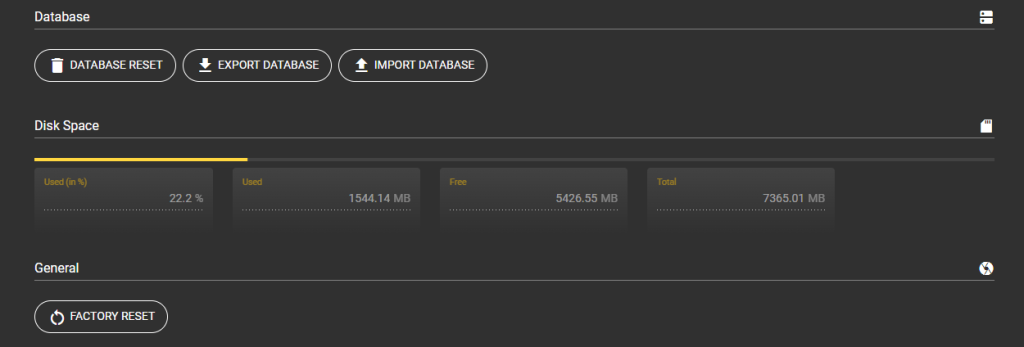
7. Storage
Under the menu item Storage you will find information about your storage space. You can also use the buttons below to reset your database and the system to factory defaults.
Database reset
Reset all settings of the camera. Misconfigurations can thus be corrected
Attention
All stored information will be deleted by this process!
Export Database
Export all your settings using this button. This includes all configurations including the set parameters, saved images and set networks.
Import Database
Use this button to import one of your databases directly to the camera. For example, if you need to change or expand the hardware, you can easily access all your settings via this option. This includes all configurations including the set parameters, saved images and set networks.
Disk Space
Used (in %)
Here you can see what percentage of the memory is already in use.
Used
Here you can see how many MB of the memory are already used.
Free
Here you can see how many MB of memory are still free.
Total
Here you can see how many MB your memory has in total.
File System Storage
Max Storage Capacity
Set the maximum size of your file storage here. You can find the file storage under the Files menu item.
Used
Here you can see how many MB of the memory are already used.
Factory Reset
Use this button to reset your camera to the factory default settings.
Attention
All stored information will be deleted by this process!
8. System
8.1 System information
All properties of your system are listed under this item. These include:
Camera
Docker variant
Focus
Lens
obstructed light
Wireless connection
Sensor code
Display
All this information can also be used as bookmarks.
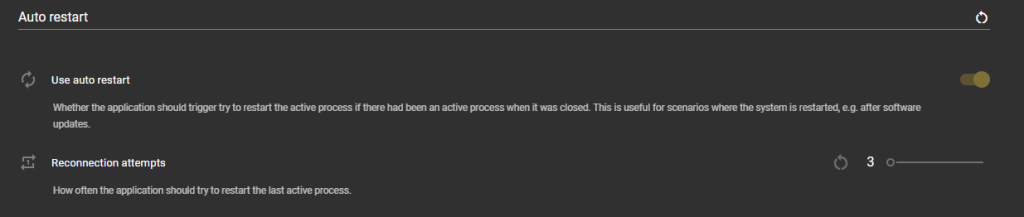
8.2 Auto Restart
Use Auto Restart
Select this option if you want to enable Auto Restart. Your system is then automatically restarted – for example after software updates – and restores the last active process.
Reconnection Attempts
Set here how often your camera should try to restore the last active process when restarting.
8.3 System Actions
Power Off
Use this button to turn off the camera.
Reboot
Use this button to reboot your camera.
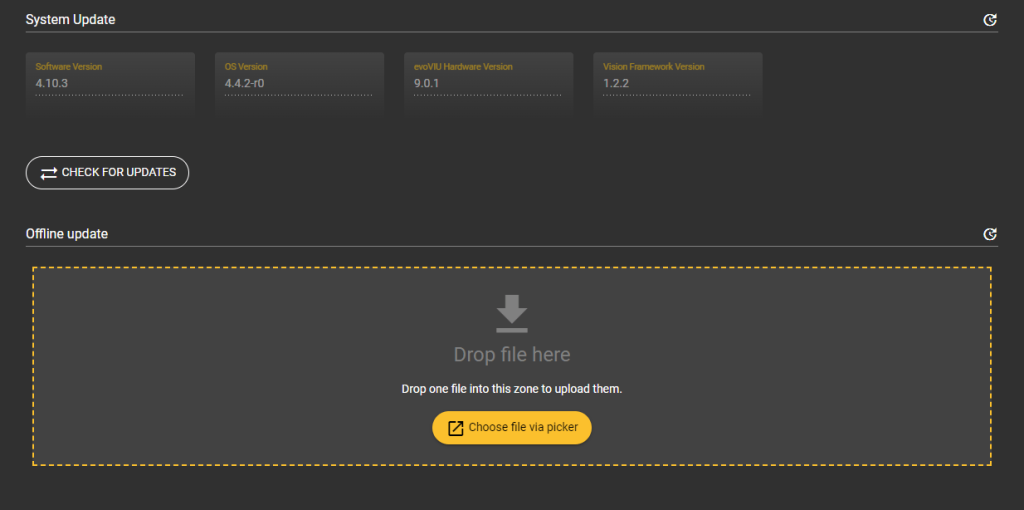
9. Update
Under System Update you can see your software version, your OS version, your evoVIU hardware version and your Vision Framework version. Also, you can check for updates under this item and run them or perform offline updates.
Check for updates
You can use this button to check for updates online. For this, the camera must be connected to the Internet. After clicking the button you will get feedback which new software version is available. Also, the Start Update button appears. Click this to perform the update. While the update is in progress, you will see a yellow bar. As soon as this goes out, the process is finished. Wait about 30 seconds and then reload the application. Here you should again get a hint of a new SSL key.
Offline update
If your camera is not connected to the Internet, you can perform an offline software update. To do this, you will receive a file that you can drag and drop into the designated field. Then a dialog box appears in which you have to enter a key. When you are finished, click Confirm. The file is uploaded and the update is executed. Wait about 30 seconds and reload the camera.
Übersicht
WEBINAR
Optimize processes:
Transformation through modern image processing