In this chapter, you will learn which setting options you have in the Configuration Bar of the Image Source.
1. overview
In the Configuration Bar you can make all kinds of settings for your image. You can change these settings at any time regardless of your stream’s activity. To have a better overview of the setting options, you can show and hide the individual sub-items at any time.
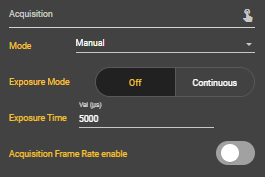
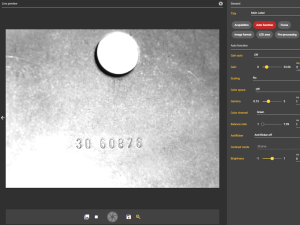
2. acquisition
Fashion
In the image capture settings you can choose between the four different capture modes: Manual, Free Run, Hardware and Remote. In addition, settings can be made for the exposure mode, exposure time and frame rate. Depending on the mode, there are further setting options.
Mode 1: Manual
Manual mode is set by default. In this mode, you can take a picture manually using the yellow button in the Image Source Control Bar.
Exposure Mode
For the exposure mode, you can select either continuous or off. If you set the exposure mode to continuous, the camera permanently adjusts the exposure to the external conditions. If you set it to Off, you can set the exposure time manually.
Exposure Time
When the exposure mode is set to Off, you can select an exposure time between 68 and 2300000 microseconds. This determines how long the camera allows light to reach the sensor while the image is being captured. The longer the exposure time, the more light and the brighter the image will be in the end. If you see a black image on the first exposure, it is often because the exposure time is set too low.
Acqusition Frame Rate enable
Here you can decide whether you want to activate the acquisition frame rate or not.
Acqusition Frame Rate
If you have activated the Acquisition Frame Rate, you can select a value between 2 and 255.9 here. This value refers to the frames per second that are recorded.
Mode 2: Free Run
Your pictures are taken continuously in Free Run mode. Here you have the same setting options as in Manual mode and one more.
Frame Rate
You can select how many images per second should be recorded. Select a value between 1 and 30 fps. A high frame rate can have a negative impact on the performance of the camera.
Mode 3: Hardware
In hardware mode, a hardware trigger via the trigger pin of your smart camera’s docker connector triggers the recording. Three additional settings are added to the already known settings from the Manual mode.
Delay
For Delay you can set a value between 0 and 5000 milliseconds. Depending on the input value, image acquisition is delayed after the trigger.
Bouncing Time
You can select a value between 0 and 1000 for the bouncing time. This is the time to wait after a trigger before reacting to a trigger again. In this way, it can be avoided that several shots are taken in between due to faulty triggers.
Edge
Here you can set whether the image should be captured as soon as the trigger is released (rising) or as soon as the trigger is no longer perceptible (falling).
Mode 4: Remote
With the remote mode you can also capture the images manually, but not via the web interface, but via the http-rest interface. The setting options are the same as for the Manual mode.
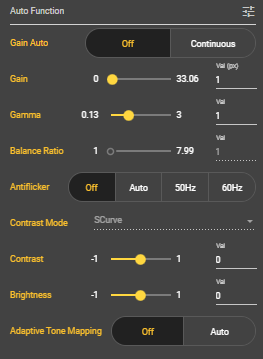
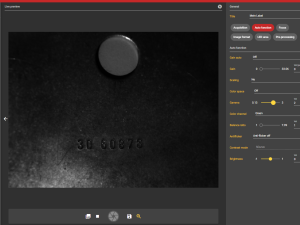
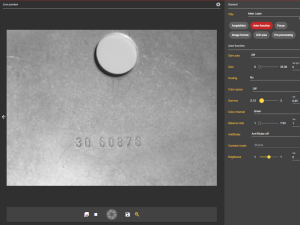
3. auto function
Under the Auto Function subitem, you can make various settings that are already taken into account by the image sensor during acquisition.
Gain Auto
Here the gain can be adjusted automatically to achieve a certain brightness. With the gain function you can amplify the sensor signal and thus brighten up your image. If you want to set gain manually, select Off. The gain parameter appears. If you set Gain Auto to continuous , the gain value adjusts to the external conditions.
Gain
Enter a value between 0 and 33.06 to make your image brighter. All pixel values on the image are amplified when the gain is increased.
Gain value 0
Gain value 7
Gamma
With this parameter you can adjust the gamma value. The values can range from 0.13 to 3. This allows you to optimize the image brightness for display on a monitor.
Gamma value 2
Gamma value 0.45
Balance Ratio
This setting allows you to manually apply a color shift for white balance. White objects should appear white.
Antiflicker
The anti-flicker setting allows you to combat streaking that may occur due to lighting. The different setting options determine the frequency.
Contrast Mode
For this parameter, the so-called S-curve is selected by default. This will increase the contrast of your image. With the S-curve, lighter tones are lightened further and darker ones are darkened further to obtain a high-contrast image.
Contrast
You can adjust the contrast of your image here. If you select a negative value, the image becomes darker. If you select a positive value, brighter.
Brightness
Here you can adjust the brightness. If you select a negative value, the image becomes darker. If you select a positive value, brighter.
Adaptive Tone Mapping
Here you can switch the Adaptive Tone Mapping of the image sensor on or off. The goal of tone mapping is to reduce the contrast range of images so that they can be displayed on conventional output devices.
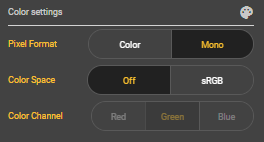
3. color
Under the Color sub-item you can make various adjustments to the color settings of your image.
Pixel format
Here you can select Color or Mono as pixel format. The pixel format determines how the individual pixels are structured and how the image data is displayed.
Color Space
Here you can decide whether you want an sRGB color space or not. sRGB stands for Standard RGB and is the typical color space for graphics on the web. It makes sense to select the sRGB color space if the image brightness is to be optimized for display on a monitor.
Color Channel
Here you can set which of the color channels red, green or blue should be displayed.
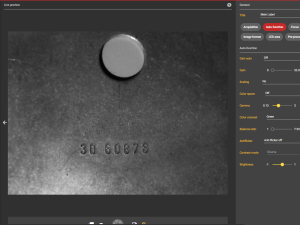
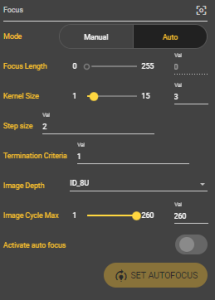
4. focus
Under this item, you can set the focus manually or automatically. If you want to set the focus manually, select a value between 0 and 255. This parameter is only relevant if a liquid lens is installed in your evoVIU. Then you can focus your object here.
Focus Length
Select a value between 0 and 255 here to adjust the focus and thus bring your image into sharp focus.
Autofocus
Kernel Size
A larger kernel size can enable more precise processing of the image and therefore better focusing of the object. However, a kernel size that is too large can also lead to unwanted artifacts or increased noise in the image, which in turn can lead to poorer focusing. It is important to choose the appropriate kernel size for autofocus depending on the application and the requirements of the camera.
Step Size
The step size is an important parameter that determines how accurately an algorithm processes an image. If the step size is too large, the autofocus may not capture the object accurately enough because it does not collect enough information about the entire surface of the object. If the step size is too small, however, the autofocus may take too much time to focus on the object, which in turn can lead to poorer performance.
Termination Criteria
Termination criteria specify when an algorithm should be terminated, based on certain conditions that must be met during processing. With regard to autofocus, termination criteria can be used to ensure that the autofocus focuses on the object before it ends the focusing process.
Image Depth
Image Depth refers to the number of color channels present in an image. The Image Depth can affect the accuracy of the autofocus, as the autofocus may have difficulty focusing on the subject due to differences in color depth.
Image Cycle Max
Image Cycle Max refers to the maximum number of images that can be captured and processed in a given period of time. The Image Cycle Max can be an important factor as the autofocus needs to work in real time to continuously monitor and adjust the focus of the subject. A low Image Cycle Max can result in the autofocus not being able to react quickly enough to changes in the image, which can lead to blurred images.
Activate auto focus
You can activate and deactivate the autofocus here.
Click on this button to start the autofocus. From here, the camera does the work for you.
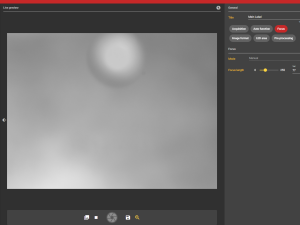
Focal length 77
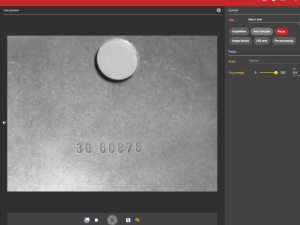
Focal length 217
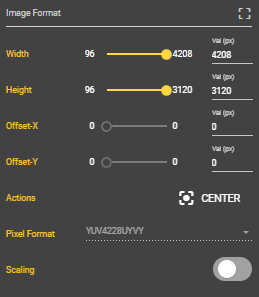
5. image format
Under the item Image Format you can set the number of pixels and accordingly the resolution of your image. You can set your desired width as well as the width, X offset and Y offset. The choice of image format also has an influence on the performance of the web interface.
Width
Here you set the width of your image.
Height
Here you set the height of your image.
Offset-X
Here you can move your image on the X-axis to get the desired image section.
Offset-Y
Here you can move your image on the Y-axis to get the desired image section.
Actions
Click on Center to center all the above settings.
Pixel format
Here you can see with which pixel format output pixels are formatted. The pixel format determines how the individual pixels are structured and how the image data is displayed.
Scaling
The Scaling parameter allows you to scale images from the sensor size to your image ROI.
Sharpness Enhancement
If you have processed your image with the Scaling parameter, you can increase the sharpness with the Sharpness Enhancement. To do this, you can select a value between 0 and 1. The higher the value, the sharper the image.
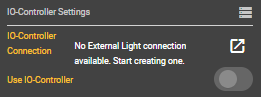
6. IO controller
Under this menu item you can set your IO controller to use external light.
IO Controller Connection
Here you can select your IO-Controller Connection. You must configure these beforehand under the Connections menu item.
Use IO controller
Select here whether the IO controller is to be used or not.
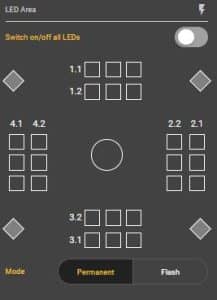
7. LED Area
Under the menu item LED Area you can control the light of your evoVIU. Depending on which light module you have installed, the display may look different. The boxes shown correspond to the individual LEDs.
If you select this setting and confirm the dialog, all LEDs are switched on simultaneously. The intensity is then also the same for all LEDs.
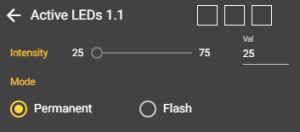
If you want to select the LEDs individually, you can simply click on one of the boxes and the respective segment will open. Here you can now select which LED you want to switch on in the upper right corner. After the click, they turn yellow.
Intensity
Set the intensity of the lights here. The higher the value, the brighter the LEDs shine.
Fashion
Select whether the LEDs should light up permanently or flash.
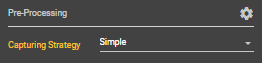
8. pre-processing
Under this menu item, presettings for image processing can be made.
Capturing Stategy
Select how you want your picture to be taken here. You have the choice between Simple, Image Fusion and Double Shot.
Simple: The image is captured depending on the selected capture mode.
Double Shot: Two images are taken from two different sides and fused together.
Image Fusion: Four images are taken from the four sides and fused together to create a depth image.
Übersicht
WEBINAR
Optimize processes:
Transformation through modern image processing