evoVIU Dokumentation
-
Hardware
-
-
- Articles coming soon
-
-
-
Software
-
- Articles coming soon
-
- Articles coming soon
-
- Articles coming soon
-
- Articles coming soon
-
- Articles coming soon
-
- Articles coming soon
-
-
Introduction
-
General & Safety
The custom routines are a relic from earlier versions of the camera. They have now been almost completely replaced by workflows. However, as some of them are still in use, the instructions remain here. However, please be aware that some components now look different or have a different name.
The Recorder Custom routine allows you to save images to a defined endpoint. This chapter tells you everything you need to know to perform this custom routine.
1. overview
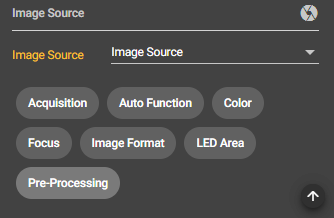
Once you have captured an image in the Image Source, you can select it in the Custom Routine Configuration Bar under Image Source. Without this selection, the routine cannot be started.
Click on the Play button in the Control Bar to start the stream. Depending on the recording mode you have set, your image will appear as a stream. But before images are forwarded, you have to make further settings.

1. FTP Settings
If you want to save your images on an FTP server, you have to make specifications here under the FTP Settings.
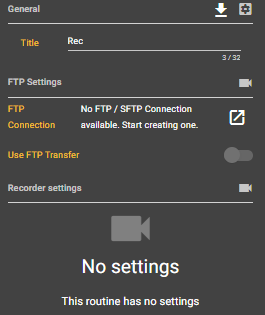
FTP Connection
Select your created FTP connection under this item. You can create them under the Connections item.
Directory
Enter the path of your storage location where you want to save your images. Thus, a new folder is created for the operation.
Use FTP Transfer
Here you can select whether you want to use FTP transfer or not. Only if the button is activated, images will be saved on your FTP server.
2. S3 AWS Settings
If you want to store your images on the AWS Cloud, you need to enter your details here under the S3 AWS Settings. The whole thing works analogously to point 1.
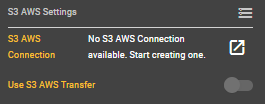
S3 AWS Connection
Select your created S3 AWS Connection under this item. You can create them under the Connections item.
Directory
Enter the path of your storage location where you want to save your images. Thus, a new folder is created for the operation.
Use S3 AWS Transfer
Here you can select whether you want to use the transfer to the cloud or not. Only if the button is enabled, images will be saved to your cloud storage.
3. azure settings
If you want to store your images on the Microsoft Azure Cloud, you need to enter your details here under Azure Settings. The whole thing works analogously to points 1 and 2.
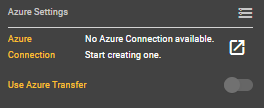
Azure Connection
Select your created Azure Connection under this item. You can create them under the Connections item.
Directory
Enter the path of your storage location where you want to save your images. Thus, a new folder is created for the operation.
Use Azure Transfer
Here you can select whether you want to use the transfer to the cloud or not. Only if the button is enabled, images will be saved to your cloud storage.
4. image quality settings
Select here in which file format your images should be saved. Weigh here whether image quality or data size is more important to you.
File Format
Choose from BMP, JPG or PNG file formats here. The formats process your images differently.
Scaling
Choose here between Original, High, Medium and Low. This choice affects the file size.
